 Pin it
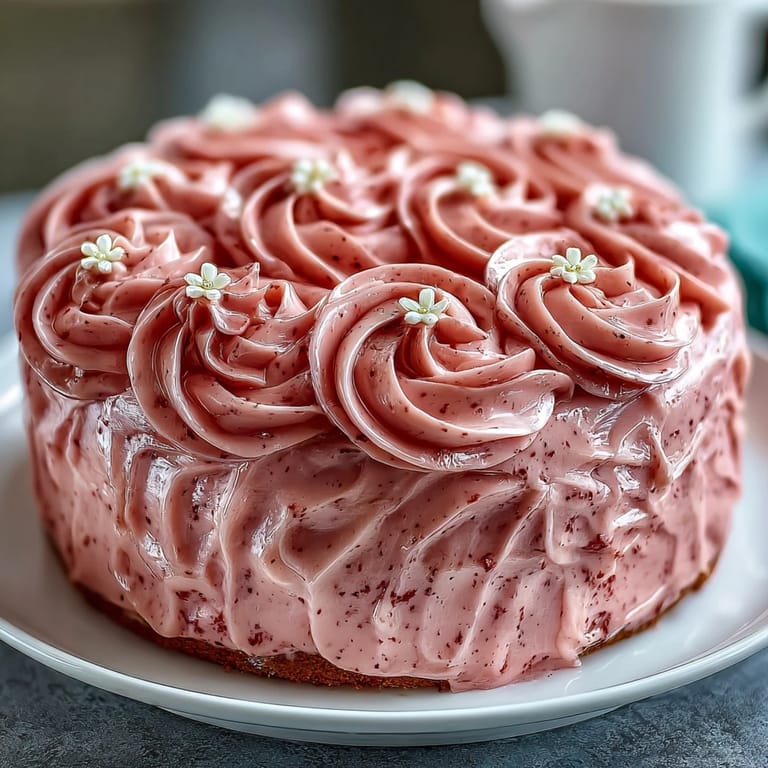
 My sister texted me a photo of a pink ombre cake she'd seen at a bakery, saying it was the only thing she wanted for Mother's Day. I stared at that image for about five minutes, then thought: why not make it myself? Turns out, those soft gradient layers aren't nearly as intimidating as they look, and watching my mom's face when she saw it rise above the cake plate made every minute of buttercream tinting worth it. This cake became the centerpiece of that Sunday, but more importantly, it became proof that something truly special doesn't need complicated techniques—just patience and a little color.
I made this cake for my best friend's mom, who'd raised three kids and never once complained about the chaos. Watching her laugh and cry at the same time when she saw it—that's when I realized a cake isn't about the difficulty level or Instagram appeal. It's about showing up with something you made with your own hands, saying without words: you matter enough for me to spend an afternoon in the kitchen.
Ingredients
- All-purpose flour (2 ½ cups): The backbone of tender sponge—measuring by weight instead of volume actually changes the whole texture, so grab a scale if you have one.
- Baking powder (2 ½ tsp): This lifts the cake without making it cakey, creating that delicate crumb that melts on your tongue.
- Salt (½ tsp): The quiet hero that makes vanilla taste more like vanilla instead of just sweet butter.
- Unsalted butter (1 cup for cake, 1 ½ cups for frosting): Room temperature is non-negotiable—cold butter won't cream properly, and your cake will be dense and heavy.
- Granulated sugar (2 cups): Creaming this with butter incorporates tiny air pockets that make the cake tender and light.
- Large eggs (4): Room temperature eggs blend smoothly into the batter without leaving streaks or lumps that won't bake out.
- Pure vanilla extract (1 tbsp plus 2 tsp): The pure stuff matters here—imitation vanilla gets lost in buttercream, so don't skimp.
- Whole milk (1 cup): Room temperature milk means it won't shock the warm batter and create lumps or break the emulsion.
- Powdered sugar (5 cups, sifted): Sifting removes lumps that would texture your buttercream and make spreading feel gritty.
- Gel food coloring (pink): Gel colors are concentrated, so you need less and they don't thin your buttercream like liquid colors do.
- Edible flowers: Violets, pansies, and rose petals add elegance—buy them the day you decorate or they'll wilt and lose their magic.
Tired of Takeout? 🥡
Get 10 meals you can make faster than delivery arrives. Seriously.
One email. No spam. Unsubscribe anytime.
Instructions
- Prep your stage:
- Preheat your oven to 350°F and get three 8-inch pans ready with parchment paper—this isn't just convenience, it's insurance against cakes that stick and tear. Have all your ingredients at room temperature sitting on the counter; cold eggs and milk are the silent saboteurs of smooth batter.
- Mix the dry ingredients:
- Whisk flour, baking powder, and salt together in a medium bowl until they look evenly combined. This simple step distributes the leavening evenly, so you don't end up with pockets of dense cake next to airy sections.
- Cream butter and sugar:
- Beat room-temperature butter and sugar together on medium-high speed for 3 to 4 minutes until the mixture looks pale and fluffy, almost like frosting. This is where the magic starts—you're aerating the butter, which creates all those tiny air pockets that make the cake tender.
- Add eggs one at a time:
- Drop in each egg individually and beat well after each addition, making sure it's fully combined before the next one arrives. This prevents the batter from looking separated or broken, which would make the final cake dense.
- Incorporate vanilla and flour:
- Pour in the vanilla, then add the flour mixture in three parts, alternating with milk and beginning and ending with flour. Mix on low speed just until you don't see any white streaks—overmixing here is how you wake up a tough, rubbery cake.
- Distribute and bake:
- Divide batter evenly among the three pans and smooth the tops lightly. Bake for 25 to 30 minutes until a toothpick comes out clean and the cakes smell like vanilla heaven, then cool in the pans for 10 minutes before turning out onto racks to cool completely.
- Make the buttercream base:
- Beat room-temperature butter on high speed for 2 to 3 minutes until it's pale and creamy, then gradually add the sifted powdered sugar while mixing on low so it doesn't fly everywhere. Add vanilla and milk, then beat on high for 3 minutes until fluffy and smooth.
- Create the ombre shades:
- Divide buttercream into four bowls—leave one pure white, then add increasing amounts of pink gel coloring to create light, medium, and dark pink shades. The gel coloring lets you build color gradually without making the frosting too soft, which is the whole secret to a beautiful ombre.
- Layer and frost:
- Place the first cake layer on your serving plate and spread a thin layer of the darkest pink buttercream on top, then stack the second layer and spread medium pink on it. Top with the third layer, spread light pink on top, and use the white buttercream to coat the sides for contrast.
- Blend and smooth:
- Use an offset spatula to smooth everything, then grab a bench scraper and gently blend the ombre effect up the sides of the cake by moving the scraper through the different pink shades. This creates that gorgeous gradient that makes people think you're a professional cake decorator.
- Decorate and chill:
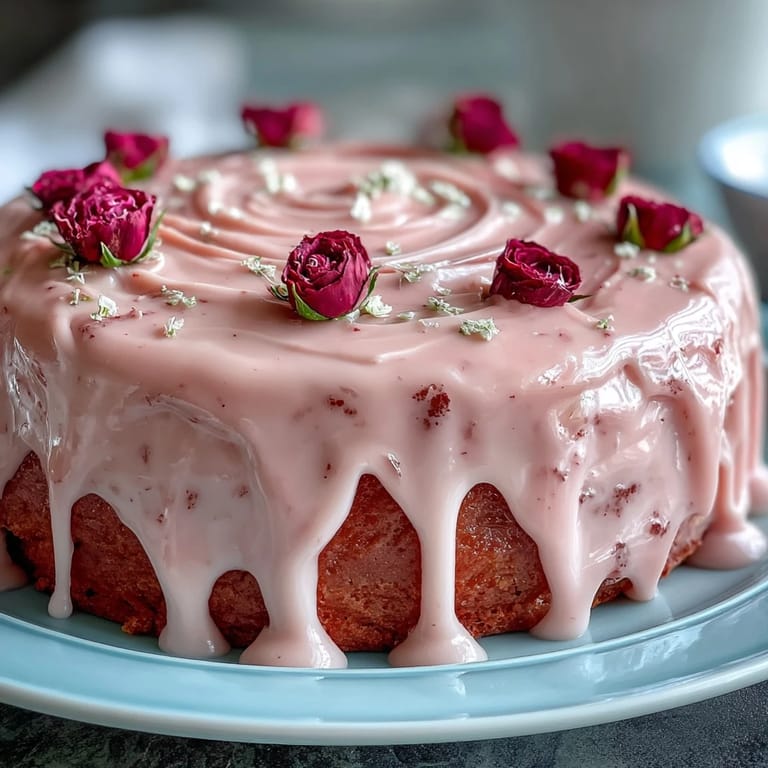
- Arrange edible flowers on top and around the cake just before serving so they look fresh and vibrant. Chill the finished cake for at least 30 minutes so the buttercream sets and gives you clean slices instead of frosting mush.
 Pin it
 The moment I stepped back and looked at that finished cake—three layers stacked perfectly, the pink shades flowing from deep to barely-there—I understood why people choose to make cakes instead of buying them. It wasn't about being cheaper or even tasting better. It was that the cake held a story, evidence of a specific person thinking about another person enough to spend an afternoon figuring out buttercream.
The Secret of Tender Vanilla Cake
Tender cake comes from creaming, not from fancy ingredients or mysterious techniques. When you beat butter and sugar together long enough, you're forcing tiny air bubbles into the fat, and those bubbles expand in the oven to create a light, delicate crumb. I learned this the hard way after making dense cakes for years, rushing through the creaming step because I was impatient. Now I set a timer and let that mixer run—it's the only step where time actually makes the cake better, not worse.
Why Edible Flowers Change Everything
A cake with perfect layers and smooth frosting is beautiful. A cake with edible flowers is memorable. There's something about fresh flowers that signals care and intention, like you didn't just bake something, you curated an experience. The first time I decorated a cake with violets, my niece looked at it and asked if it was okay to eat something this pretty—that question alone told me flowers were worth the fussing over.
Beyond the Basic Frosting
Once you nail this ombre buttercream, you'll start seeing color gradients everywhere and wanting to recreate them on cake. The technique is simple—cream your butter, add sugar, divide, and color—but the impact is huge. Some people brush their cooled cake layers with simple syrup before frosting to add moisture, which is especially helpful if the cake sits for more than a day. Others pair this cake with sparkling rosé because the vanilla sweetness and dry bubbles create this perfect balance on your palate.
- Simple syrup is just equal parts sugar and water heated and cooled, brushed on warm cake layers to add moisture.
- If you're making this ahead, freeze the unfrosted cake layers wrapped tightly for up to three days.
- Edible flowers wilt quickly, so decorate no more than a few hours before serving unless you want them looking sad.
 Pin it
 This cake exists to celebrate someone, and that's really all there is to it. Make it for the person who deserves to know they're special.
Recipe FAQ
- → How is the pink ombre effect achieved?
Buttercream is divided into portions and tinted with varying amounts of pink coloring, then layered from darkest to lightest to create a gradient effect.
- → What kind of flowers are safe for decoration?
Edible flowers like violets, pansies, and rose petals are used to adorn the cake, adding freshness and elegance.
- → How do I ensure the sponge is tender?
Carefully creaming butter and sugar until fluffy and alternating dry ingredients with milk creates a moist, soft texture.
- → Can this be prepared ahead of time?
The cake layers can be baked in advance and chilled before frosting; chilling after decorating helps set the buttercream for clean cuts.
- → What tools aid in creating smooth buttercream layers?
An offset spatula and optional bench scraper help spread and blend the buttercream evenly for a polished finish.