Pin it
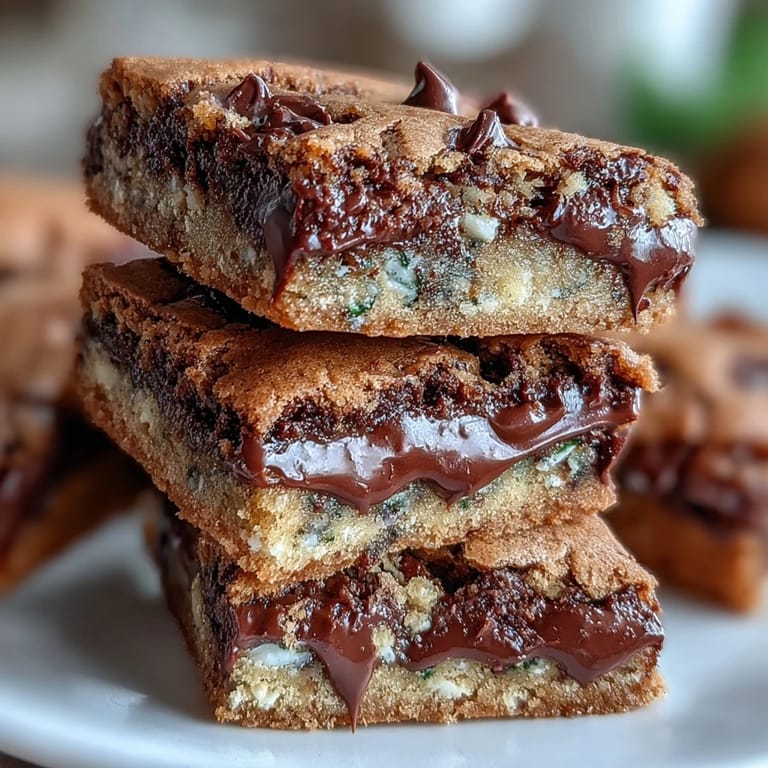
 My neighbor knocked on the door mid-March with a plate of these bright green cookie bars, and I was instantly suspicious—until I took a bite. The chewy texture, the way the chocolate hit my tongue, the festive sprinkles that tasted like pure sugar and joy—I was sold. She laughed at my expression and promised the recipe was simple enough that even I could pull it off, which felt like a dare I couldn't refuse.
I made these the first time for a St. Patrick's Day potluck at work, and they vanished before the cupcakes even made it out of their box. One coworker actually asked if I'd bought them from a bakery, which felt like the highest compliment—turns out homemade bars with store-bought sprinkles beat fancy store-bought desserts every single time.
Ingredients
- All-purpose flour (2 1/4 cups): This is your base—don't sift it unless you love dense bars, and resist the urge to add more flour than listed or they'll turn cake-like instead of chewy.
- Baking soda (1/2 teaspoon): Just a touch helps the bars rise gently and gives them that perfect tender crumb.
- Salt (1/2 teaspoon): Brings out the chocolate flavor so it doesn't taste flat or one-note.
- Unsalted butter, melted (1 cup): Melted butter creates a denser, chewier texture than creamed butter, which is exactly what you want here.
- Light brown sugar and granulated sugar (1 cup plus 1/2 cup): The brown sugar adds moisture and a subtle molasses depth, while the white sugar keeps things bright.
- Eggs (2 large): Bind everything together and add richness—room temperature eggs incorporate more smoothly, though cold ones work fine if you're in a hurry.
- Pure vanilla extract (2 teaspoons): The real stuff matters here because it's not baked into obscurity; it stays present in every bite.
- Semi-sweet chocolate chips (1 1/2 cups): The workhorse chocolate that makes these bars actually taste like chocolate bars, not just sugar vehicles.
- White chocolate chips (1/2 cup): These add sweetness and visual contrast; they melt slightly during baking, which is perfect.
- Green sprinkles or sanding sugar (1/4 cup): Half goes in the dough for surprise pops of color, half on top for that undeniable festive look.
- Green chocolate candies (1/2 cup, optional): If you use them, they stay firm and chewy rather than melting like chips, adding a fun texture element.
- Clover-shaped sprinkles (optional): Pure decoration, but they make people smile before they even taste anything.
Tired of Takeout? 🥡
Get 10 meals you can make faster than delivery arrives. Seriously.
One email. No spam. Unsubscribe anytime.
Instructions
- Set up your pan:
- Preheat your oven to 350°F and line a 9x13-inch pan with parchment paper, letting the edges overhang so you can lift the entire slab out later. This step saves you from mangled bar edges and makes cleanup feel like a gift to your future self.
- Combine the dry goods:
- In a medium bowl, whisk together flour, baking soda, and salt until evenly distributed. This step prevents baking soda clumps that would create bitter spots in your bars.
- Mix the wet base:
- In a large bowl, whisk together the melted butter, brown sugar, and granulated sugar until the mixture looks smooth and slightly glossy. You're not creaming anything here, just making sure the sugars dissolve into the butter.
- Incorporate eggs and vanilla:
- Add the eggs and vanilla to the wet mixture and whisk until everything is well combined and you don't see any streaks of egg white. This takes about a minute of actual whisking effort.
- Fold in the dry ingredients:
- Using a spatula, gently fold the dry mixture into the wet mixture until you see just a few streaks of flour remaining. Stop here—overmixing develops gluten, which makes bars tough instead of chewy.
- Add the chocolate and sprinkles:
- Stir in the semi-sweet chips, white chocolate chips, and half of the green sprinkles with a few gentle strokes. The dough should look speckled and festive already.
- Spread and top:
- Pour the dough into your prepared pan and smooth it out as evenly as you can with a spatula or the back of a spoon. Scatter the remaining green sprinkles, any green candies, and clover sprinkles across the top—there's no such thing as too much green here.
- Bake until golden:
- Bake for 23 to 26 minutes, until the edges are just starting to turn light golden and a toothpick inserted in the center comes out with a few moist crumbs clinging to it. The bars will continue to set slightly as they cool, so err on the side of slightly underbaked.
- Cool completely:
- Let the bars rest in the pan until they're completely cool to the touch before lifting them out. Cutting them while warm will result in a crumbly mess; patience here prevents disappointment.
 Pin it
 My sister brought her young daughter to help me make these the next year, and watching her carefully arrange the clover sprinkles with complete seriousness was the moment I realized these bars had become more than just a dessert—they were a tradition. Every March since, we make them together, and the bars taste different because they're made with her hands in the dough.
The Secret to Chewy Bars
The magic happens when you use melted butter instead of creamed butter and don't overmix the dry ingredients. Melted butter creates a denser crumb that stays moist longer, while gentle folding prevents the bars from puffing up and becoming cakey. I learned this the hard way by making a test batch with regular creaming method, which resulted in bars that were more cookie-like than bar-like.
Making Them Ahead
These bars actually taste better on the second day after the flavors meld together slightly. I make them two days before any party or gathering, store them in an airtight container at room temperature, and they stay fresh and chewy the entire time. They also freeze beautifully for up to two months, so you can make a batch in February and still have festive bars ready in March without any last-minute panic.
Customization Without Losing the Magic
The foundation of these bars is so solid that you can play around with additions and toppings without ruining them. I've swapped in dark chocolate chips when I wanted something less sweet, added crushed pretzels for a salty crunch, and even drizzled melted white chocolate on top after baking for an extra fancy finish. The key is respecting the ratio of chocolate chips to dough, because too many mix-ins will make the bars crumbly instead of cohesive.
- If you're adding nuts, chop them finely and use them to replace up to half of the chocolate chips, not in addition to them.
- For a white chocolate drizzle, melt the chips in a bowl over hot water and drizzle with a fork or whisk for those Instagram-worthy streaks.
- Green food coloring is totally optional—the sprinkles provide all the festive color you need.
 Pin it
 These bars have become my St. Patrick's Day signature, the thing people ask for before they ask what I'm wearing green. They're proof that simple homemade baking beats fancy every time.
Recipe FAQ
- → What makes these bars chewy?
The combination of melted butter, brown sugar, and eggs creates a moist, tender texture that yields chewy bars.
- → Can I substitute the all-purpose flour with gluten-free flour?
Yes, gluten-free flour blends can be used, but the texture may vary slightly. Adjust baking time as needed.
- → How should I store the bars to keep them fresh?
Store in an airtight container at room temperature for up to a week or freeze for longer storage.
- → What are some decoration alternatives to green sprinkles?
Try chopped nuts, colored sugars, or drizzled melted white chocolate to add variety and festive appeal.
- → Can these bars be made nut-free?
Yes, simply avoid nuts and check that chocolate and toppings are processed in nut-free facilities to reduce allergen risks.